Local H2 in-memory DB with Spring Boot
Configuring a local instance of a database service, the DB schema and java-config could kill the last desire to work. Because setting up all staff related to a database can take a lot of time, the local H2 database instance can help to quickly create a prototype of an app with a persistence layer. Especially when we would like to check or create only a small solution so an in-memory database sounds perfect for this case. What is more, H2 is very fast, small and offers transaction support. In this article, I will take off the hover of the magician box and present how big power is hidden inside this little monster.
Local H2 setup with Spring Boot
The Spring Boot ecosystem fully supports the H2 database and does a lot of magic underhood for us. The common use case of this in-memory DB is the independent integration tests running but we can also configure it fully as the main database. To start using it we need to include some dependencies in the project. In my example, I used Spring Boot + Maven and put relations to spring-boot-starter-data-jpa and h2 artefacts. Both with the default scope for maven’s dependencies (compile).
<dependency>
	<groupId>org.springframework.boot</groupId>
	<artifactId>spring-boot-starter-data-jpa</artifactId>
</dependency>
<dependency>
	<groupId>com.h2database</groupId>
	<artifactId>h2</artifactId>
</dependency>
And to be honest, that is all. We have our in-memory database on the boat. Spring Boot configures the local H2 database with the user “sa” and the empty password by default. But we can easily override these values by creating the application.yaml file in the project resources path and including there some properties as shown below. We have large flexibility here and a lot of features ready to use. You can read my configuration file below which I used to prepare this example.
spring:
  datasource:
    username: rich
    password: code
    url: jdbc:h2:mem:richdatabase
#    url: jdbc:h2:file:./h2/data # if we want to store data somewhere
    driverClassName: org.h2.Driver
  jpa:
    spring.jpa.database-platform: org.hibernate.dialect.H2Dialect
I think, the spring.datasource.username and spring.datasource.password properties are obvious and I would like to move your attention to spring.datasource.url property and stop for a while. The value “jdbc:h2:mem:richdatabase” means that the H2 instance will store data in the memory of the application (keyword “mem“) and the database is named “richdatabase“. This approach makes all data volatile and they will be gone after the application stop. It is important to remember and avoid being surprised.
But, if we need to store data and be independent of the application’s lifecycle, we can use file-based storage. To make this real, we have to use “jdbc:h2:file:./h2/data” as a value of the previously mentioned property. The keyword “file” means that we use file-based storage and after “:” sign we have to specify the path to this file.
Besides this, I configured the driver and dialect by spring.datasource.driverClassName and spring.datasource.jpa.spring.jpa.database-platform.
Database initialization
With the current created configuration, Hibernate will try to generate for us the database schema based on java classes. Nice! We will have it for free and I think it is a good price. For this example, I created the simple class SuperHero with some basic fields. Using ORM, it will produce the corresponding table and columns in the local H2. You can read it below.
@Data
@Entity
public class SuperHero {

    @Id
    @GeneratedValue(strategy = GenerationType.IDENTITY)
    private int id;

    @Column(nullable = false)
    private String firstname;

    @Column(nullable = false)
    private String lastname;

    @Column(nullable = false)
    private String nickname;

}
Almost all applications need data to work so it would be nice to not input records into the database every time when we start the app. To resolve this problem, we can create a basic SQL script to initialize our database and eliminate unnecessary frustration. Let’s put some inserts into a file named data.sql under /src/main/resources directory. It is important to keep this convention because then our dear worker Spring Boot will take this file and run it during the application startup but before Hibernate initialization! So if we use database schema auto-generation based on java classes, we will have a problem.
INSERT INTO SUPER_HERO (firstname, lastname, nickname)
VALUES ('Bruce', 'Wayne', 'Batman');

INSERT INTO SUPER_HERO (firstname, lastname, nickname)
VALUES ('Anthony', 'Stark', 'Iron Man');
To drop that issue and reverse the initialization order, we need to set spring.jpa.defer-datasource-initialization property to true in the application.yaml. After it, Spring Boot will populate data.sql script after a schema generation by Hibernate so we will have a good order of processes, the schema first, later data. Great success!
spring:
  jpa:
    defer-datasource-initialization: true
H2 web console
As developers, we sometimes need to check what data are stored inside our database, run some SQL queries, look for records and compare column values. All of it is possible by the embedded web console in the H2. Embedded Web Consol! Does it sound cool? We receive the whole tool to work with our database directly from our browser completely out of the box. It is not exposed by default but we can enable and configure it by adding the properties presented below.
spring:
  h2:
    console:
      enabled: true
      path: /h2-console
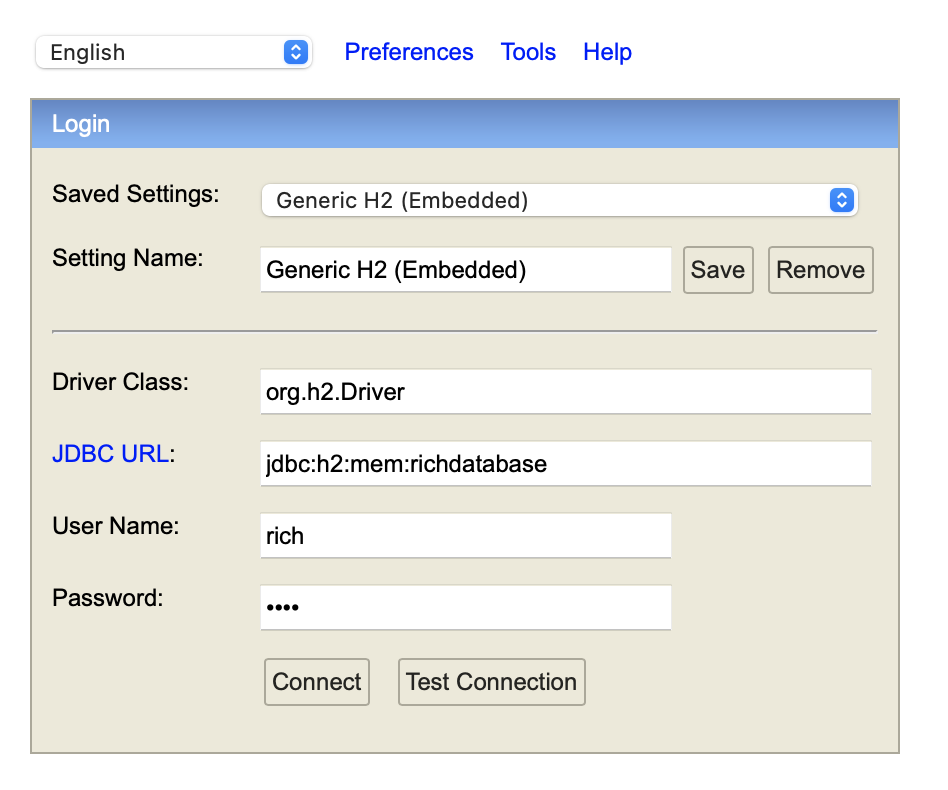
After this, we are able to open the H2 web console. In my case, it is available under http://localhost:8080/h2-console url. As the first step, we need to establish a connection using the configuration panel. We need to use the default user without any password or credentials used in the application.yaml.

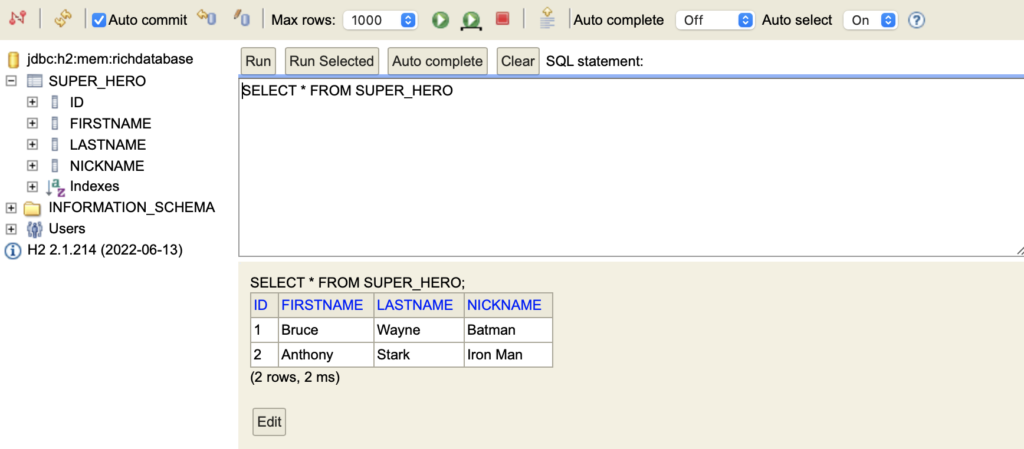
After it, we gain full insight into our database so it is easy to see tables, columns and indices. Datatypes used in the schema and constraints also are not a challenge. We have also a small window to execute queries and see the results of them.

All examples from this post you can find on my GitHub here
There is no fun in spending time on configuration so if we can do less in this area but keep its usefulness, it is better for us. With the H2 database, we gain everything that we need to build a small solution and we can focus on the thing which is really interesting for us. What with the saved time? We can spend it in a more important way like a coffee break.
The same programmers as us work everywhere.
Oskar K. Bogacz

